 Enji's Blog
Sharing WinSCP configurations
You may have experienced the situation that an experienced team member, equipped with a large number of configured WinSCP sites, would like to share this information with a newbie team member (and all future newbies). A simple export & import will not suffice, since the configuration contains personalized authentication data (usernames and passwords, or keyfile locations). And you don’t want to force the newbie to manually copy-and-paste connection data and his own authentication data into a series of new WinSCP sites, as this would be inefficient, tedious, and error-prone.
Solution (overview)
Here is a quick overview of the solution to this problem. Details will be given in the sections below.
Export and de-customization of the existing configuration:
- group sites with identical authentication data into WinSCP folders
- export the configuration into an
inifile using the appropriate WinSCP dialog - de-customize this configuration via command line (reset credentials & working directories)
- do some clean-up on the
inifile (history) - share the
inifile with the newbie (e.g., by committing it to your team’s SCM)
Customization and import of this configuration:
- retrieve the
inifile - customize this configuration via command line (set credentials & working directories)
- launch WinSCP with this configuration
Solution (details)
Grouping
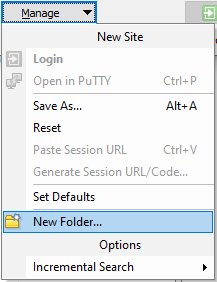
When using a central LDAP server for authentication, most of your logins will require the same credentials. At the same time, there might be logins with special credentials (such as read-only “view” users for certain test servers) that don’t require customization, and that shall be left untouched. To allow the newbie to customize the right sites with a single batch script, you have to group them using WinSCP folders. This can be done inside WinSCP by choosing Manage > New Folder:
Here is a simple example how your WinSCP layout might look like:
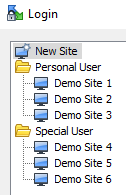
This scheme can be easily extended to cover multiple personal users, and combined with sub-folders for managing different projects.
Export
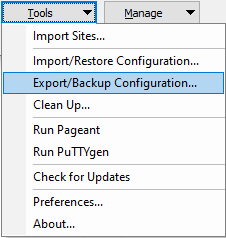
Export the configuration by choosing Tools > Export/Backup Configuration inside WinSCP:
De-Customization
In this step, you overwrite personalized data from the exported configuration with generic default values:
- user names
- key file locations
- working directories
This is done by executing the following script:
@echo off

REM configuration settings used below
set YOUR_INI="demo.ini"
set YOUR_LDAP_USER="ldapuser"
set YOUR_WINDOWS_USER="winuser"
set YOUR_PRIVATE_KEY="C:\Users\You\privatekey.ppk"
set WINSCP_DIR="C:\Program Files (x86)\WinSCP"

REM adapt login credentials
%WINSCP_DIR%\WinSCP.com ^
  /ini=%YOUR_INI% ^
  /batchsettings ^
  "Personal User"/* ^
  UserName=%YOUR_LDAP_USER% ^
  TunnelUserName=%YOUR_LDAP_USER% ^
  PublicKeyFile=%YOUR_PRIVATE_KEY% ^
  TunnelPublicKeyFile=%YOUR_PRIVATE_KEY%"

REM adapt working directories
%WINSCP_DIR%\WinSCP.com ^
  /ini=%YOUR_INI% ^
  /batchsettings ^
  */* ^
  LocalDirectory="C:\Users\%YOUR_WINDOWS_USER%" ^
  RemoteDirectory=/
So what is happening here?
/iniprovides the location of your exportedinifile/batchsettingsenables mass-modification of stored sitesPersonal User/*and*/*match the site configurations inside the existing foldersUserNameandTunnelUserNameare self-explanatoryPublicKeyFileandTunnelPublicKeyFileprovide the location of your private SSH key fileLocalDirectoryandRemoteDirectoryprovide the directories that are opened by WinSCP after login
Note that we use WinSCP.com instead of WinSCP.exe for scripting.
If you are working with passwords instead of key files, you have to provide the PasswordPlain parameter to reset your passwords. However, this only works if you first disable your WinSCP master password, so be careful when doing this.
Cleanup
The exported ini file contains several lines of usage history that you can easily clean up with a text editor. Simply search for the following section headers, and delete the lines below:
[Configuration\History\Commands][Configuration\History\EditFile][Configuration\History\LocalTarget][Configuration\History\PuttyPath][Configuration\History\RemoteTarget]
To make sure that you didn’t miss anything, you can manually double-check the values stored in the config file, and search for your user name and the string pass.
Customization
To customize a generic ini file with your personal settings, you execute the same script as above. But this time, you provide your real personal settings as values to the initial configuration parameters (YOUR_LDAP_USER, YOUR_PRIVATE_KEY, …).
Launching with a specific config
The customized ini file can be provided as command line parameter to WinSCP:
%WINSCP_DIR%\WinSCP.exe /ini=demo.ini
This way, you can also organize your sites into multiple files, and create appropriate shortcuts for on-demand use.
References
WinSCP version used for this article: 5.17